8 Easy Nail Art Designs That Even Shaky Hands Can Do
These simple, gorgeous manicures will still impress.
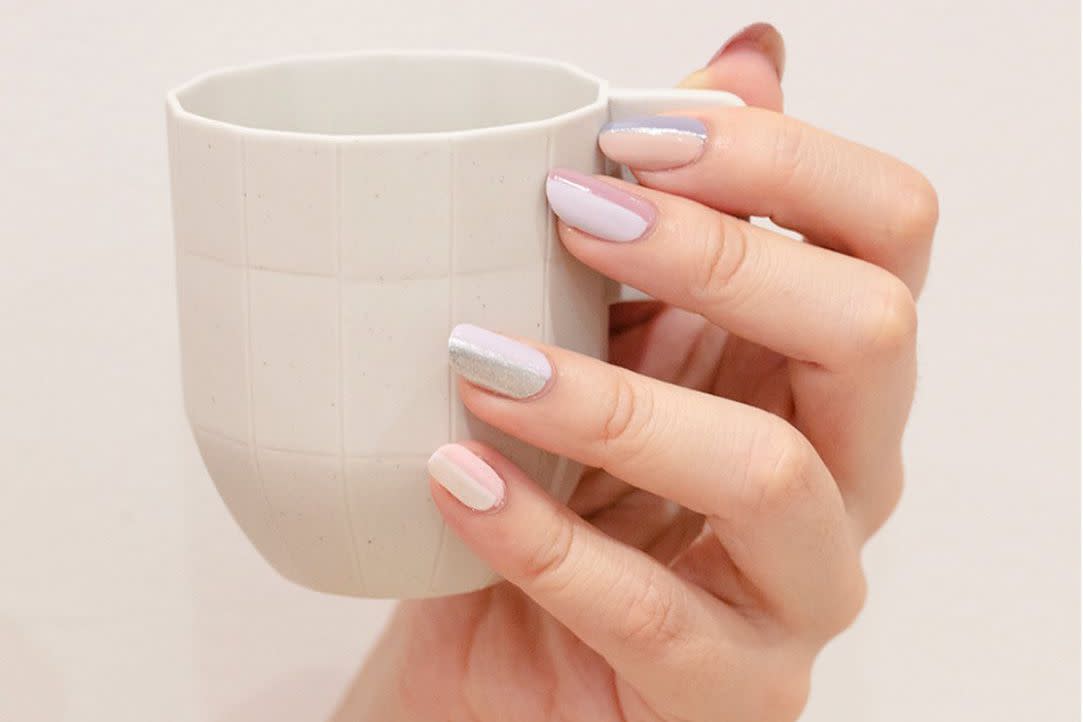
@sundays_studio/Instagram
Painting your nails is tricky enough, especially when it comes time to paint with your non-dominant hand. Add in nail designs and the whole manicure process can feel intimidating. And if you have reduced dexterity or just naturally shaky hands, you may feel like DIY nail art is out of your capabilities.
But before you shell out money for a professional salon job, try your hand at these easy, gorgeous manicures first. We rounded up the best nail art ideas that even little time and poor stability can conquer—some involve simple brush strokes you can effortlessly paint on while others utilize tools or tricks that streamline the process.
RELATED: 12 Unique Ways to Wear a French Manicure
Easy Nail Art Designs
Multi-Colored Stripes
The beauty of this easy manicure, created by @paintbynaptime, is that there’s charm in its abstract imperfection. You simply need a nail painting brush and three to six complementary colors. After painting on a clear base coat, draw stripes onto your nails in alternating colors, then seal with a top coat. (This set of 5 nail art brushes features a soft grip that makes it easier to hold the brush.)
Neutral, Two-Toned Nails
The neutral, stone-esque tones of this simple manicure by Sundays Studio reads super sophisticated and playful at once. To recreate, paint your nails the lighter color and allow it to set. Then, place a piece of nail tape down the center and paint on the darker color on one half. Let it dry, then remove the tape and apply a top coat.
Abstract Waves
You can recreate this easy nail art idea with any color combination of your choice. Instagram user @ralucaa.nailtech opted for creamy brown tones for a monochromatic, earthy effect. Paint your thumb, pinky, and pointer fingers the darker color and the others a lighter hue. Next, use a nail art brush to create abstract waves with the darker color you used. The addition of a white wave adds more depth.
DIY Marble Stickers
Before writing off this complicated-looking nail art design, know that it’s far easier to create than you may think! The process involves DIY-ing your own nail stickers, which Alena Monson, founder of Whats Up Beauty and Nails, says is super easy for beginners or anyone with shaky hands.
Apply drops of two to three nail polish colors onto wax paper, then swirl around with a toothpick or nail art brush. It should be big enough to cover your entire nail. Wait a couple hours for the design to dry.
“Cut the polish sheet close to the shape of your nail, place it on a sticky nail base, push it down with your fingers, and spread it out evenly,” says Monson. “Then, trim excess polish and use a brush dipped in acetone to smooth the edges before covering with a top coat.” (Here’s a tutorial if you need help visualizing.)
Criss-Cross French Mani
French manis are having a moment right now, and lots of variations exist. This one, created by Bellacures, combines two contrasting colors abstractly brushed in a V-shape across the nail tip. Paint one side first with the lighter hue, let it dry, then paint the other side before sealing with a top cost. “If you accidentally got some polish on your skin, don't fret,” says Rianna Basurto, marketing specialist with Bellacures. “Take either a brush or Q-tip dipped in acetone to clean the polish off.”
Faded Gold Chrome Tips
Nothing says luxe mani quite like a touch of golden chrome. As fancy as this manicure is, though, it’s simple to recreate. Start by applying a base coat and neutral gel polish, then wipe off the tacky layer with rubbing alcohol and apply a no-wipe top coat and cure for 60 seconds. “The no-wipe top coat is a must in order for the chrome to look smooth and shiny,” says nail tech Haley Ann. “Wipe again with rubbing alcohol, take a small amount of chrome powder, and rub it into the cured top coat until it becomes shiny.” Seal with the top coat again and cure. She usedLuxa Platinum Chrome Powder to create this nail design.
DIY Heart Stickers
Another example of a DIY nail art sticker, this one is arguably a bit simpler, especially if you have a heart-shaped hole punch that creates the design for you quickly. Follow the same instructions as above, then peel the design off the wax paper and punch out the designs. Apply to tacky nails, then seal with a top coat.
Blue Sky & Clouds
Start by painting your nails a pale blue color, then dip a nail painting brush into white and fluff it onto your nails to create soft, fluffy clouds. Just like real clouds, they don’t have to have precisely defined lines or look perfect. In fact, taking an easygoing approach can make them look more realistic.
For more Real Simple news, make sure to sign up for our newsletter!
Read the original article on Real Simple.
