Cassandra's Journey: The Legacy of Nostradamus Walkthrough, Cheats

Cassandra's Journey: The Legacy of Nostradamus Tips
Check out our strategy guide for Cassandra's Journey: The Legacy of Nostradamus.
GENERAL INFO
At the beginning of the game you will be asked to play in Timed or Relaxed Mode. Choose Relaxed Mode if you want to play without having to worry about the timer. Choose Timed Mode if you like to play against the clock.
If you get stuck in any of the games and you need to see the instructions again, you can click on the help button that is at the bottom of the page. You will be able to see the complete instructions for the level that you're on.
When you exit out of a scene, your progress for that level will be lost. Since there are only one or two pages per level in the game, it shouldn't take too long to replay the last scene.
FINDING OBJECTS
You will have to find objects in a scene according to the list that is at the bottom of the page. You will be shown 6 items at a time and each time you find an item, a new one will be revealed until you find all of them.
Look on the lower left side and you'll see a counter that says 00/16. The first set of numbers lets you know how many objects you found so far and the second will let you know how many objects need to be found in total.
Some items will be partially hidden in a scene when you're looking for them so keep an open mind when you're trying to locate an item. For example you may be looking for a violin but all you will be able to see will be the top part of it, the rest will be hidden behind something else.
If you can't find an item, you can use one of the three different hints available in the game. Please read the hint section below to learn more about it.
HINTS
There are 3 different types of hints that are available to you in this game, each one shows you an item from the list in a different way.
You can buy extra hints with the gems that you find in every scene.
Magnifying Glass - Hint By Object - This hint will show you the exact location of an item. It will cost you 6 gems to buy this hint.
"?" - Hint by Area - This hint will show you the general area of an item that you're looking for. You will see a large illuminated square, the item that you need to find will be somewhere in that box.
Magic Wand - Once you pick up the wand, you will notice that at certain points the wand will start glowing as you hover it over the scene. The brighter the light is on the wand, the closer you are to finding an object.
The hints will only show you a random item from the list, there's no way to make it show you a specific item that you're looking for. The only exception to that rule is when you need to find a riddle item. Click on a riddle to open it and then click on "hint" you will then be able to see the location for the item of that particular riddle.
GEMS
There are 3 gems in each scene, a green one, a red one and a light blue one.
Find all the gems in a scene to earn extra hints.
Each gem is worth 6 points each.
Once in a while a gem will start to shimmer a bit to make it easier to find.
BUYING GEMS
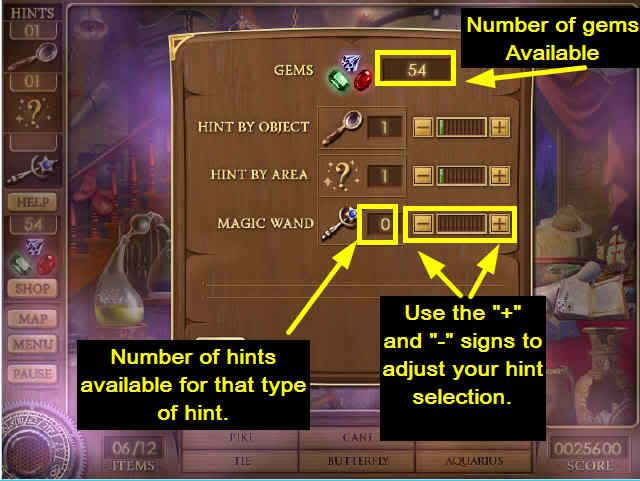
To buy gems, simply click on the word 'shop" and you will be taken to the section in which you can buy extra hints. It is located on the left side of the page.
On top of the gage you will see a number. That number represents how many gems you've collected.
Next to the name of the hint, you'll see some plus and minus signs. Use the plus sign to increase the number of gems, use the minus sign to take some gems off.
The number next to each hint, shows you how many hints you have of each particular item.
The hints that pinpoint an item will cost you more than a gem that gives you the general location of an item.
The hint by object (the magnifying glass) will cost you 6 gems.
The magic Wand hint will cost you three gems.
The hint by area (the "?") will cost you 2 gems.
SPOILER ALERT!!!
The following section contains the solutions to the majority of the puzzles in the game. Please stop reading now if you don't want to know the answers.
LEVEL 2 - RING'S BOX - Fix the word Ring
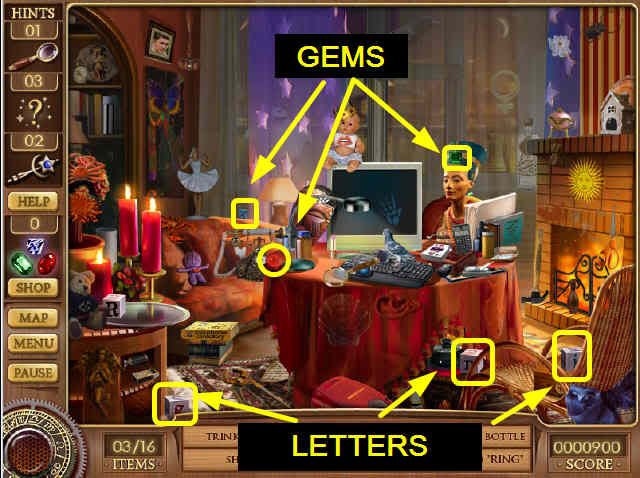
Blue Gem - Center left side of the scene, on the arm of the couch.
Red Gem - on the left side of the round table.
Green Gem - On Nefertiti's head that is on the table, right side of the scene.
Fix the Word "RING"
Pick up the letters "I","N" and "G" that are scattered in the scene and place them on the small table that is on the lower left side, next to the block letter "R".
Block Letter "I" - Lower right side, on the wicker chair.
Block Letter "N" - Lower right side, in front of the wicker chair.
Block letter "G" - Lower left side, on the ground, in front of the small round table.
When you pass your mouse over the block letters, you'll see a hand appear. Left Click and hold the object in the hand and drag it over to the table and then release your mouse.
LEVEL 3 - COINS AND SECRET KEY
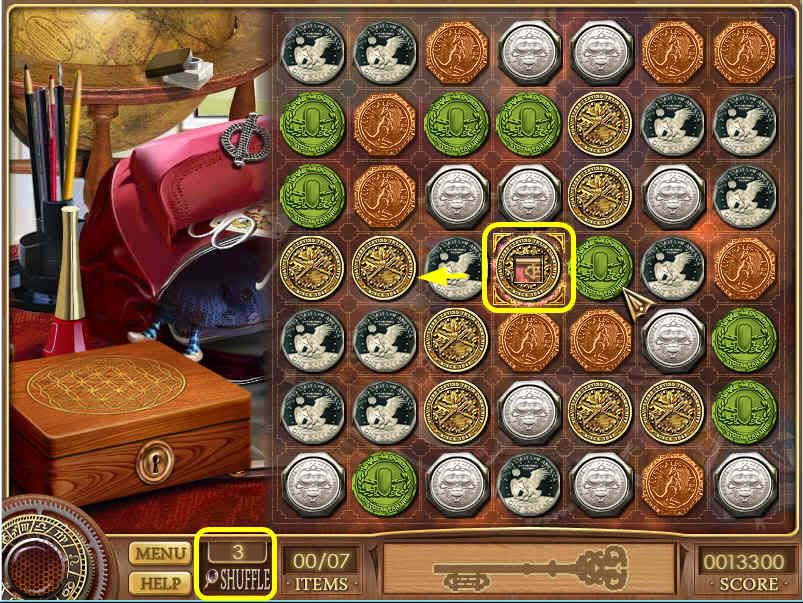
Your goal is to match 3 or more like coins to make the coins disappear off the board. Your main objective is to match the coins that have the fragments of keys in them.
You will see at the bottom of the page that there is a silhouette of a key. As you match the right coins, the key pieces will fill in. In this instance there are 7 "key" pieces that you need to find.
Click on a coin to highlight it, then click on a different coin and they will swap places if you have a match.
Only 1 coin with a key fragment will appear at a time, in order for the next one to appear, you have to match the one on the screen first.
You can click on the hint to shuffle the coins if you can't find any matches.It is located on the lower left side of the scene, you'll see a number 3 and the word "shuffle" underneath it.
LEVEL 4 - MAGIC TRICK - READING MINDS
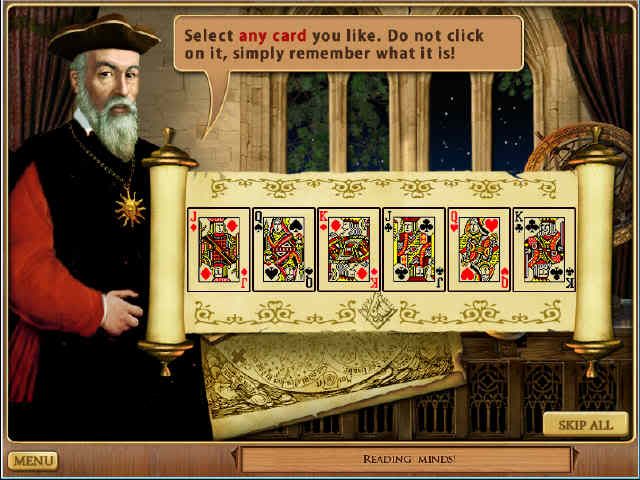
Nostradamus will show you 6 cards and will ask you to choose any card on the pile but only in your mind, don't click on it.
Click anywhere in the scene when he prompts you to do so and Nostradamus will be able to pick the card that you were thinking of.
You can play this game over and over again if you wish. Click on "Try Again" if you want to try your hand at it again. Or you can click on "Continue" to move on to the next level.
Once you finish the round you will unlock "Divination by Cards" which can be found in the Fortune Telling Room.
LEVEL 5 NOSTRADAMUS BOUNTY
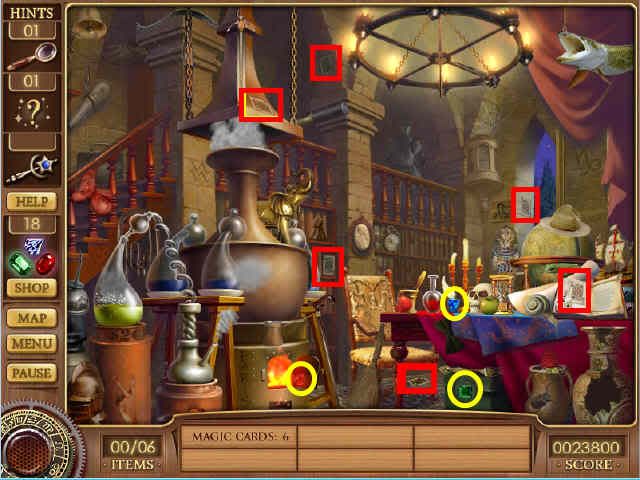
Green Gem - Lower right side, under the table.
Blue Gem - Lower right side, on the table.
Red Gem - Lower left side, on the small furnace.
Find 6 magical cards
1 - Lower right side, under the chair.
2 - Right side, behind the chair.
3 - Top center, close to the chandelier, on the column.
4 - Top center, on the hood.
5 - Lower right side, on the open book that is on the table.
6 - Right side, on the column.
Once you find all these items you will be asked to look for 12 hidden items.
Once the scene opens there are 3 more gems to find.
Green Gem - Right side, on top of the globe that is on the table.
Blue Gem - lower right side of the table, on the tablecloth.
Red Gem - On the small clear vase that sits on the table, close to the chair.
LEVEL 6 SOLITAIRE TABLE
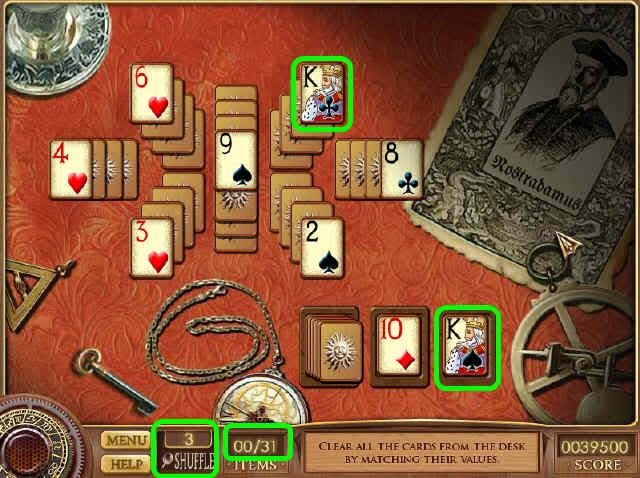
Your goal is to match 2 cards that have the same number or the same suit. Each time you match them you will eliminate them from the table. Your goal is to eliminate all the cards that are on the table.
If you get stuck and there are no matches on the table, then you can click on the cards that are in the lower right side. If you've clicked on all the cards that are on the deck, click on them again and it will show you the cards from the beginning of the deck.
You can also shuffle the deck to get a better selection by clicking on the "shuffle' section that is located on the lower left side.
All the cards from the lower deck do not need to be cleared, you only have to clear the ones that are on the center of the table.
Once you've cleared all the cards, click on the scroll to move on.
LEVEL 7 - LETTER FROM OLD - AGES
Blue Gem - on the large round table, in front of the mask.
Green Gem - Lower right side, under the chair.
Red Gem - In the fireplace, lower right side.
You will be given the silhouettes of three items at a time at the bottom of the page,once you find one silhouette,another will be shown to you immediately after.
The items will always be facing the same way as they are shown in the silhouette.
LEVEL 8 IN THE CITY PARK

In this level you need to look at the riddles that are at the bottom of the scene.Click on any of the riddle, decipher it and look for that item within a scene.
You can only click on an item in the scene when the riddle is opened to that page.
The gems are highlighted in green on the screenshot.
Red Gem - on the table that is on the lower left side, close to the grapes.
Blue Gem - Right side, on the ice cream cart.
Green gem - Lower right side, on the flowers.
RIDDLE 1: "A shell with a delicate life inside, underneath a hen do I safely hide."
It's a white egg that is in the lower left side.
RIDDLE 2: "While it's true I'm small, immature and yellow, I am quite the adorable fellow."
It's a small yellow plush duck that is on the table that is on the lower left side.
RIDDLE 3: "Often I'm handy when the weather is drizzlin', but do not forget me when the sunlight is drizzlin'.
"It's a blue umbrella that is on the lower left side of the scene.
RIDDLE 4: "A recording of sound I can play, if you simply send a record my way."
A phonograph that is on the left side of the scene behind the ice cream cart.
RIDDLE 5: "Hit to and fro with a tail of feather, a ball to withstand any type of weather." A badminton birdie on the top right side of the scene.
RIDDLE 6: "With ears, soft fur, and a carrot to eat, I'm quick when I snack, and quick on my feet."
A bunny rabbit, on the lower right side of the ground.
RIDDLE 7: "1,000 words would be the same as the photo seen without a frame."
A picture that is on the center left side of the scene.
RIDDLE 8: "Pockets too small to hold all your stuff? Allow me to help, I'm big and I'm tough."
A backpack that is hanging off the back of the chair that is on the far left side.
LEVEL 9 PHOTOS EXAMINATION
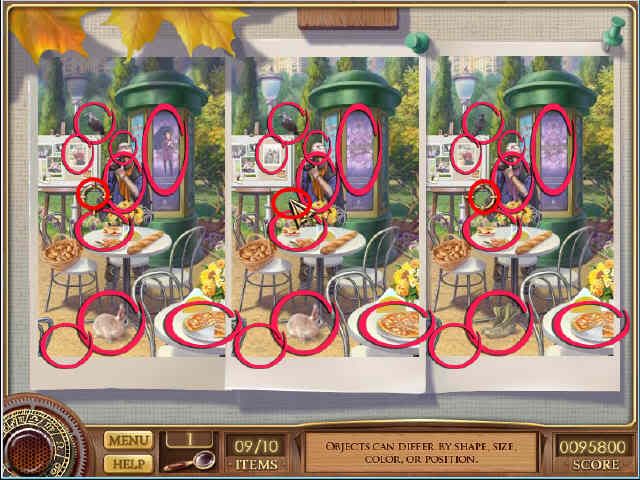
The objective of this game is to find the differences between the 3 pictures that are side by side.
Look carefully at the pictures because the items can vary slightly. It could be the same item from all 3 scenes but just the color of it is different.
You should also look for differences in shape and size or it could be something as small as the object is facing in a different direction.
Some items may be in one of the pictures but not in the other 3.
Please look at the screenshot for all 10 differences.
LEVEL 10 GRANDMOTHER'S WILL
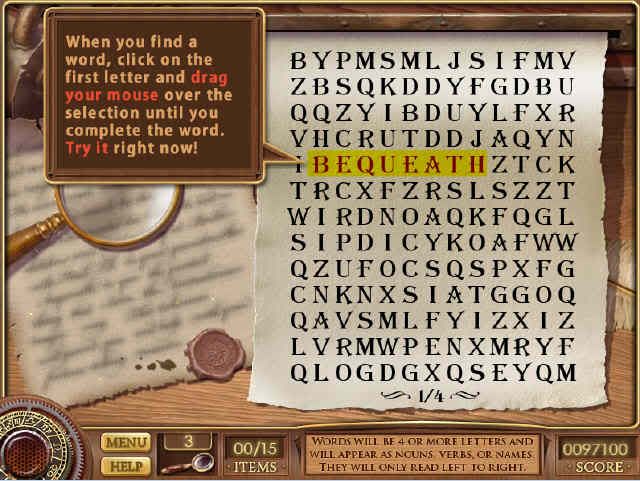
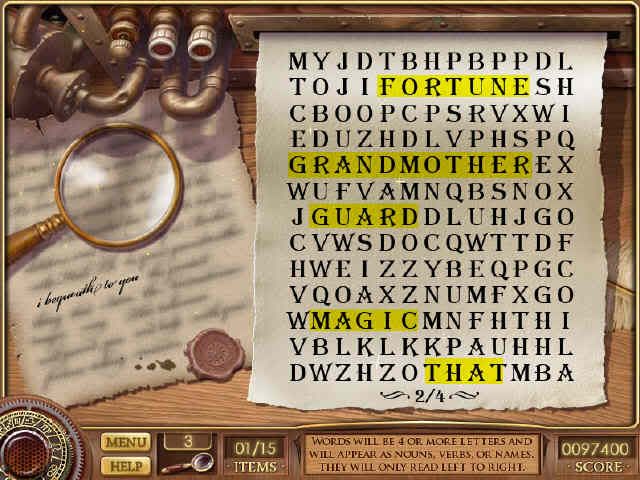

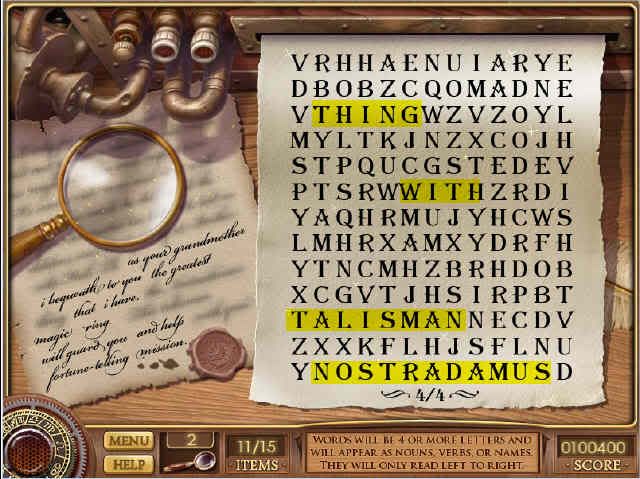
You need to search for words that contain 4 letters or more in the puzzle. the words will not be given to you so you must guess what they are.
If you look at the bottom of the page you will see where it says how many pages you will have to look through in order to find all the words.
The words may appears as verbs, nouns or names. The words will be written horizontally and only from left to right.
Click on the first letter of the word and then drag your mouse over the entire word that you wish to highlight, then release your mouse to enter your solution.
for each word that you find, parts of the testament will be revealed. If you find a word that is not on the document, it will not affect the outcome of the game.
Once you highlight all the names on all the pages you will be able to move on to the next round.
PAGE 1
BEQUEATH
PAGE 2
GRANDMOTHER
THAT
FORTUNE
GUARD
MAGIC
PAGE 3
RING
GREATEST
MISSION
HELP
HAVE
PAGE 4
THING
WITH
NOSTRADAMUS
TALISMAN
LEVEL 11 HIDE-AND-SEEK DOGGY
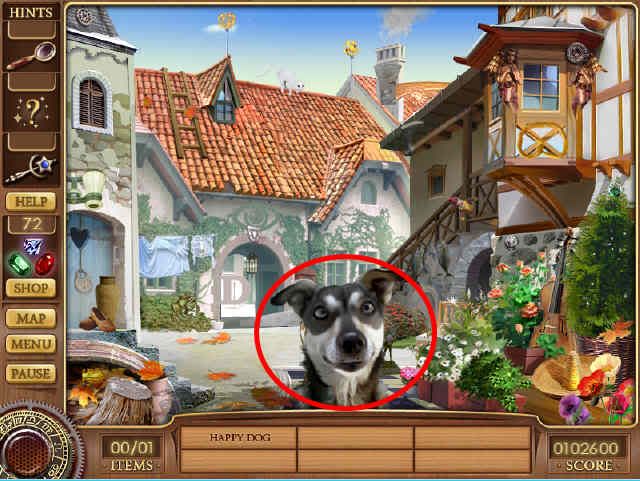
Nostradamus will ask you for help in finding his dog, the dog is actually not on the scene. He will appear on the scene approximately one minute after you've started the level.
After the dog appears you will be asked to find 12 gems/trinkets in the scene.
LEVEL 11 FIND 12 TRINKETS
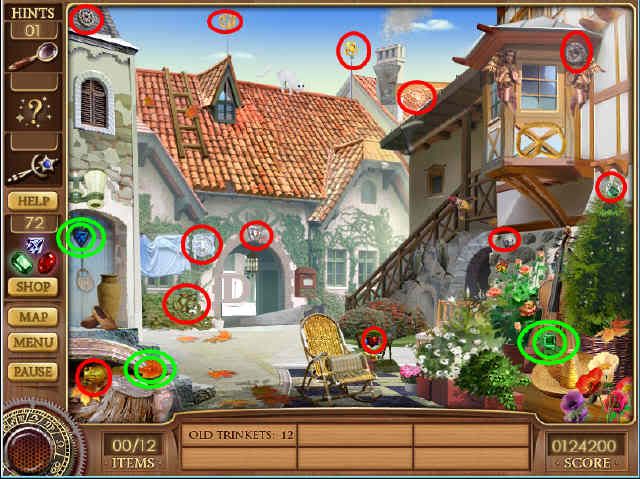
All the gems are highlighted in green on the screenshot.
Blue Gem - On the blue door that is on the left side.
Red Gem - On the lower left side on the scene,
Green Gem - Lower right side of the scene.
LEVEL 12 LATE EVENING PARK - Fix the Pizza
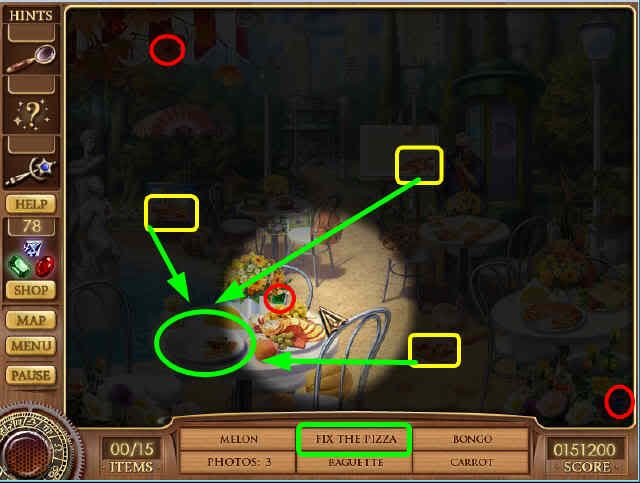
In this scene you will have to hunt for objects by looking for items with only a small spotlight.
The gems are highlighted in red and the pizza slices are in yellow. The green area is the place where you have to place all the pizza pieces.
Please look at the screenshot for the all the slices of pizza and where they belong.
Green Gem - On the table that is on the lower left side.
Blue Gem - Lower right side, on the flowers.
Red Gem - Top left side, on the orange leaf.
Fix the Pizza
Slice 1 - Grab the slice of pizza that is on the ice cream cart, left side of the scene. Place it on the plate that is on the table that is on the lower left side.
Slice 2 - Grab the slice of pizza that is on the lower right side of the floor and place it on the plate that is on the table that is on the lower left side.
Slice 3 - Grab the slice of pizza that is on the easel, next to the photographer. Place it on the plate that is on the table, left side.
LEVEL 13 ROAD TO CROW'S HOME
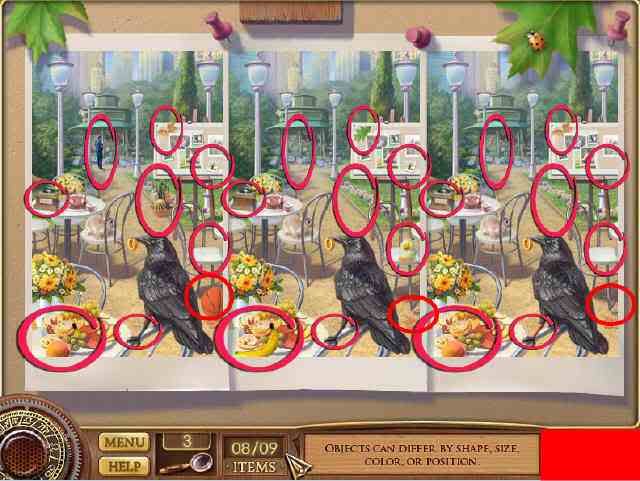
The objective of this game is to find the differences between the 3 pictures that are side by side.
Look carefully at the pictures because the items can vary slightly. It could be the same item in all 3 scenes but the color may be different.
You should also look for differences in shape and size or it could be something as small as the object is facing in a different direction.
Some items may be in one of the pictures but not in the other 3.
Please look at the screenshot for all the differences.
LEVEL 14 OPTICAL ILLUSION
You will be asked a series of questions in this round and you must answer with the correct answer if you can.
Question 1 - "The only difference between them is the brightness of the gray color. do you see this? Yes or no."
Answer is "No", the colors are the same on both sides.
Question 2 - "The neighboring lines aren't parallel; they curve a little bit. Do you see this? "Yes" "No"
Answer is no, the lines do not curve, if you look at them up close you will see that the lines are straight.
Question 3 - "The left scroll is bigger than the right one, correct?"
The answer is "No" if you measure the distance between both corners of the scrolls you will know that they have the same size.
LEVEL 15 MAGIC CRYSTAL BALL
Nostradamus will try and guess the symbol that corresponds with the number you were thinking.
Think of any 2 digit number, for the purposes of this guide we'll say 48.
When you add the number 4 and the number 8 together you get the number 12.
Subtract the first number from the second number (48 - 12=36)
Look for the symbol on the table that is on the right side that coincides with the number that you came up with. For my example, it is the symbol of a bell.
Click on any part of the screen once you have your answer and Nostradamus will guess it correctly.
If you think it was just a coincidence then you can try again with a different number or the same number if you like.
If you're done just continue on to the next chapter.
LEVEL 16 IMPORTANT PROPHECY - Fix the vase
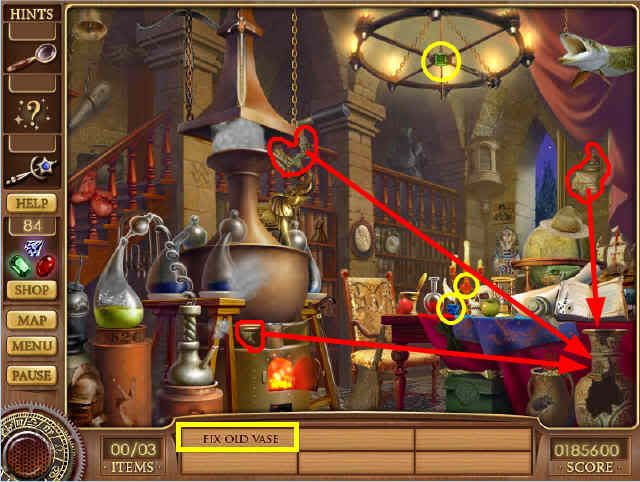
The gems are highlighted in yellow and the vase pieces are in red.
Green Gem - On the chandelier.
Blue Gem - on the round table, lower right side.
Red Gem - On the round table that is on the lower right side.
Fix old vase
Grab the the piece of the vase that is on the top right side, on the wall and place it one the vase that is on the lower right side of the room.
Grab the piece of the vase that is above the golden elephant that is close to the railing.
Take the piece of the vase that is above the furnace that is on the lower left side and place it on the broken vase that is on the lower right side.
After you're done putting the vase back together, you will be asked to find items by looking only at their silhouettes.
Once you're in this scene there will be more gems to find.
Green gem - behind the stove
Blue Gem - Lower right side, on the table, behind the open book.
Red Gem - On the table that is on the right, it blends in with the tomato that is on the table.
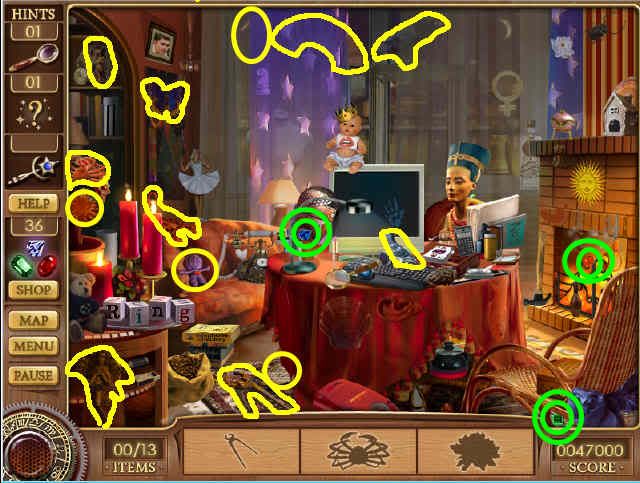
LEVEL 17 ADDRESS HUNT

On the first scene you will be asked to find the items on the list. Here are the gems for that location.
Blue Gem - Top right side, on the blue curtains.
Green Gem - On top of the computer monitor that is on the table.
Red Gem - Top left side, on the crab that is above the flowers.
For the second part you will have to solve a riddle before you can find an item,
LEVEL 17 ADDRESS HUNT RIDDLES
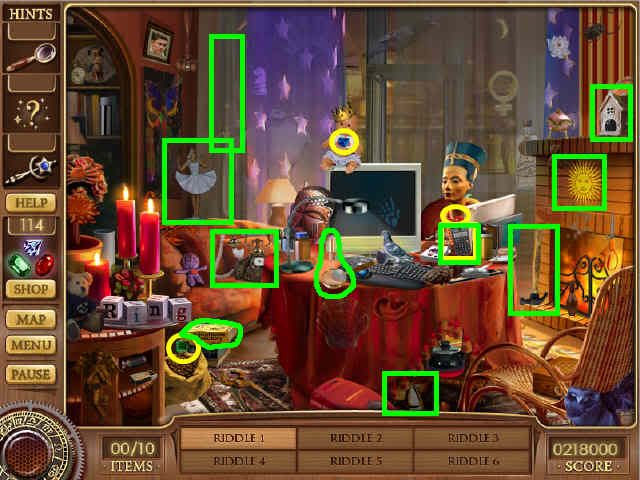
The gems are highlighted in yellow in the screenshot and the riddle items are highlighted in green.
Green Gem - Lower left side, on the bag of peanuts.
Blue Gem - On the teddy bear that is sitting on top of the monitor.
Red Gem - on the bust of Nefertiti that is on the table that is on the right.
RIDDLE 1 - "In silence I shed many volumes of light, my obvious antithesis is the darkness of night."
The sun that is on the mantle that is over the fireplace.
RIDDLE 2 - "A mechanical device with buttons to spare, computations and problems are solved without flair."
A calculator - On the large round table, in front of Nefertiti's bust.
RIDDLE 3 - Inside my walls daily memories are formed, with a loving family are my interiors warmed."
Gingerbread House, top right corner above the fireplace.
RIDDLE 4 - "Bringing people together is what I do best, found on a wall or counter do I commonly rest."
An old - fashioned telephone, it is on the couch.
RIDDLE 5 - "Blunt force do I bring with a simplistic stress, an essential instrument for a carpenter to possess."
A hammer that is on the lower right side, next to the fireplace.
RIDDLE 6 - "In your hand I make wonders in matters of size, what was small becomes large when you gaze through my eye."
A magnifying glass that is on top of the table.
RIDDLE 7 - "Created and coveted in days of old, with swift strikes and parries, justice I uphold."
A sword, it is on the top left side.
RIDDLE 8 - "With the grace of a swan do I move with great care, an artistic expression as I glide through the air." Ballerina, on the right side of the couch.
RIDDLE 9 - "Names and locations are abundantly places, a tome of resources available at length."
A yellow telephone book that is on the floor, in front of the couch.
RIDDLE 10 - "Day after day I take abuse for your feet, a covering composed of a synthetic sheath."
A pair of shoes, lower right side, in front of the table.
LEVEL 18 OLD - AGE ARTWORK

Swap pieces to make the main image appear on the page.
Once a piece is in the right place, it will lock into place.
There's a thin border around the picture, try to match the borders first and then work your way in.
You don't have to only swap adjacent pieces you can swap them from any location on the scene.
When you move certain pieces that are far away from each other you can actually see a quick glance of the piece underneath. Use that to your advantage and look for pieces that fit the area that you saw.
Please look at the screenshot for a completed puzzle.
LEVEL 19 BUSINESS CARD

There are some words at the bottom of the page, your goal is to find the words on the main page and click on them.
The tricky part comes into play because there will be lots of words flashing on the page and it's up to you to click on them as you're seeing them.
If you don't catch a word on time the first time it appears, don't worry it will appear again.
When looking for numbers make sure that you click on the right number since some of them can look like others.
For each word that you find, part of the information on the business card will be revealed along with it.
LEVEL 20 JEWELRY MAGIC TRICK
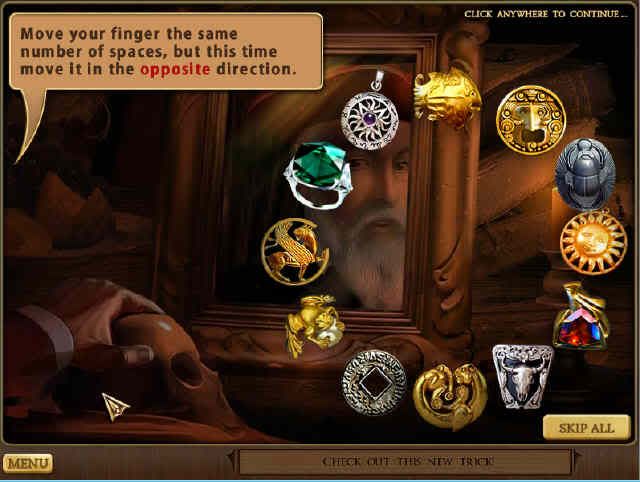
Think of a number between 5 to 15.
Place your finger over the "start" button that is highlighted oh the top right side of the page.
Starting with the 2 arrows move your finger one spot for each number you were thinking of.
The game gives you the example, if you thought of the number 12, your finger should be on the golden sun, so remember to count the arrows when you do this.
I thought of the number 10 so my finger rested on the golden frog.
Once your finger is on a jewel, the game will remove the "start" button and the arrows because they will be in the way.
Now move your finger in the same amount of spaces but this time you're going backwards.
The game will remove 4 jewels that are no longer needed.
Lastly, move your finger 4 times in any direction.
He will remove three more jewels that you don't need.Then he will remove all the gems except the one that you were thinking of.
AMAZING!!!
Divination by stars is now unlocked in the main menu.
LEVEL 21 CROWS IN THE SHED
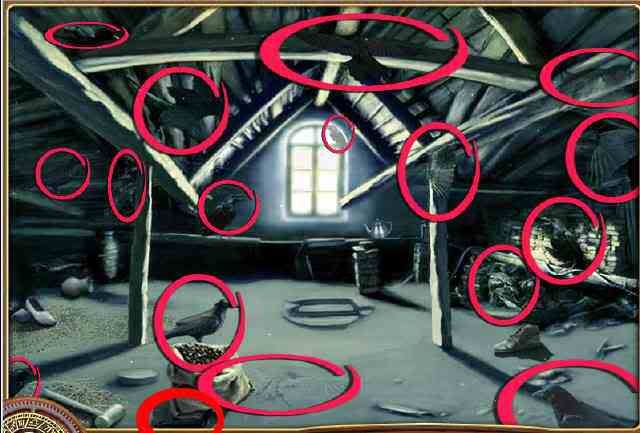
You need to find 17 crows that are hidden in the scene. Please look at the screenshot for the location of all the crows.
LEVEL 22 12MAGIC JEWELS

Coins JEWELS MAKE BRACELET
LEVEL 23 SKETCH OF A STRANGER
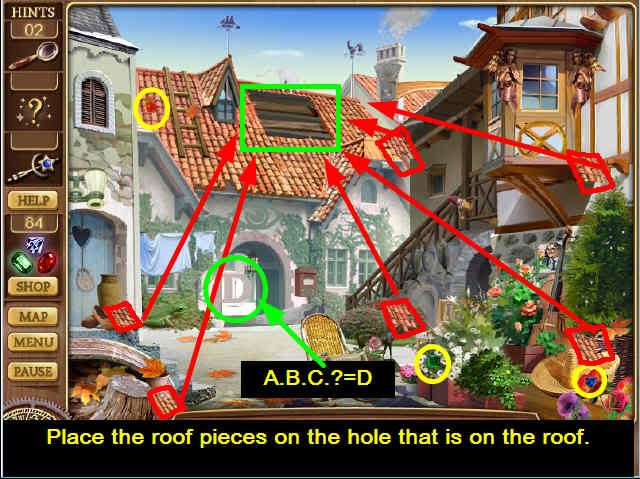
Red gem - On the left side of the roof.
Green Gem - lower right side, close to the rocking chair.
Blue Gem - Lower right side, on the red flower.
Fix the Roof
Pick up the 6 roof pieces that are highlighted in red in the screenshot and place them on the hole that is on the roof of the house.
A.B.C.? Click on the letter "D" that is on the archway of the house.
LEVEL 24 RING BUYER'S TRAIL - Eggs to basket
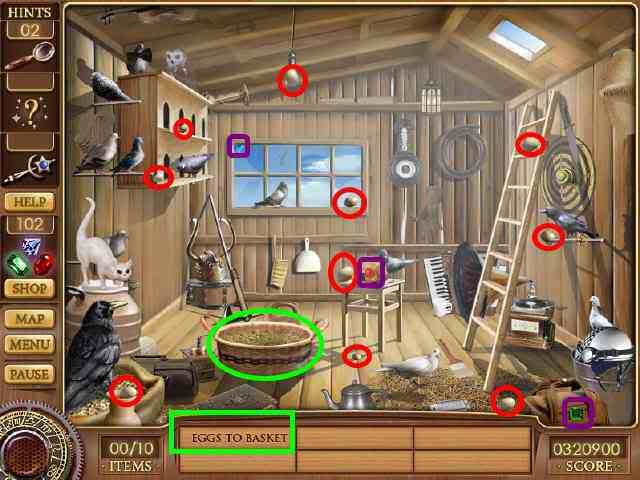
You need to find 10 eggs that are hidden in the scene and place them in the basket that is on the floor.
All the eggs are highlighted in red and the gems are in purple.
The basket that the eggs go into is highlighted in green.
Green Gem - Lower right side.
Blue Gem - Top left side of the window that is on the back wall.
Red Gem - On the small table that is in the middle of the floor.
Once you're done placing the eggs you will be asked to find some silhouette items. There are 3 new gems to find in this scene.
Blue Gem - Right side, on the crow.
Green Gem - Top left side, on the perch with the 2 pigeons.
Red Gem - Lower left side, next to the vase.
LEVEL 25 UNUSUAL SOLITAIRE

Your goal is to match 2 cards that have the same number or the same suit. Each time you match them you will eliminate them from the table. Your goal is to eliminate all the cards that are on the table.
If you get stuck and there are no matches on the table, then you can click on the cards that are in the lower right side of the deck. If you've clicked on all the cards that are on the deck, click on them again and it will show you the cards from the beginning of the deck.
You can also shuffle the deck to get a better selection by clicking on the "shuffle' section that is located on the lower left side.
All the cards from the lower deck do not need to be cleared, you only have to clear the ones that are on the center of the table.'
Once you've cleared all the cards, click on the scroll to move on.
You cannot match two cards form the deck that is on the lower right corner. You can only use one of those cards to match with one on the table.
if there are no more matches left you can click on the "Press to exit solitaire" button that is at the bottom of the screen.
