The Magician's Handbook II: BlackLore Walkthrough


Strategy Guide Table of Contents
Starting the Game
General Tips
Mini-games and Puzzles
Chapter 1-A New Friend
Chapter 2-The Watchers
Chapter 3-Blacklore's Scrolls
Chapter 4-The Secret Room
Chapter 5-Heroes and Statues
Chapter 6-A Forsaken Land
Chapter 7-Black Magic
Chapter 8-The Magical Plane
Chapter 9-The Magical Gallery
Chapter 10-Wise Old Trees
Chapter 11-The Fairy Queen
End Game
Starting the Game
Make your selections from the Difficulty Level and Story Detail modes. These choices may NOT be changed after the game is underway.
To change these, you need to create a New Game with a new Player name.
Difficulty Levels
You must choose one of two Difficulty Levels:
Casual: Object finding and puzzle solving fun without the stress of a timer!
Apprentice: All the fun but with the added challenge of a timer!
Story Detail
You must also choose one of two levels of Story Detail:
Short & Sweet: A shorter story but gets you to the action quick!
Long & Complete: Full story with all the great details!
This Strategy Guide uses the "Casual" and "Long & Complete" Settings. We'll help you try to achieve an "A" average Grade level on the game (more on Grades below).
General Tips
Magician's Handbook II might be a bit challenging for even seasoned Hidden Object Gamers, and that's a good thing! It's a complex game and seems to be designed for seasoned players of HOGs. Ah, well, if you're a beginner you can still have lots of fun!
Everything you do in this game has a reason and it all relates to the theme of the game.
Chapters
There are 11 Chapters, each consisting of several Locations which you may explore at will, and switch between Locations by returning to the Map within a Chapter.
Chapters usually include one or more Minigames after you have completed the Hidden Object Locations (see below).
While you're getting started, the Fairy "Corrigan" will be your tutor when new features are introduced. Remember that name.
Map
Each Chapter has a Map showing you the various Locations you may visit to find the Enchanted Objects.
Each Location has 10 Enchanted Objects to find, but you don't need to find all of them, only enough to fulfill the requirements of the Chapter, unless you want the top Grade A for the Chapter, in which case you need to find ALL the Objects in every Location.
If you are playing in Apprentice (timed) mode and you get stuck on one Location, return to the Map and explore the other Locations in the Chapter. Keep visiting the Locations where you have the most Objects to find.
This Strategy Guide visits the Locations in order from Left to Right, Top to Bottom on the Map. There is no required order for you to visit the Locations.
If the Map button has a Key on the top, there are hidden Keys to find there (more below about Keys).
If the Map button has a Puzzle Piece on it, it represents a Puzzle (at the end of a Chapter).
"Enchanted" (Hidden) Objects Scenes
The game designers are deviously clever in hiding the Hidden/Enchanted Objects. They use all the tricks: for example, blending the color of the Hidden Object with the background! Sometimes you need to find a WORD spelled out. Many Objects are very tiny.
For the most part, the game is fair and all the Hidden Objects are plainly visible, but not immediately obvious. For example: the game will not show one 1/10 of an Object such as only the tuning pins on a guitar or only the beak of a bird.
Many Locations are very dark (and spooky), so you might want to turn UP the brightness on your monitor (and turn DOWN your room lighting). Except for the Locations (such as "Mountain of Legends") that are very bright where you might want to turn DOWN the brightness on your monitor. Your mileage may vary.
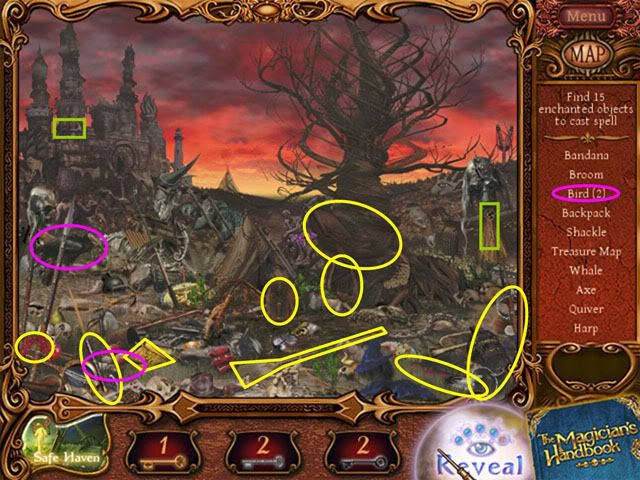
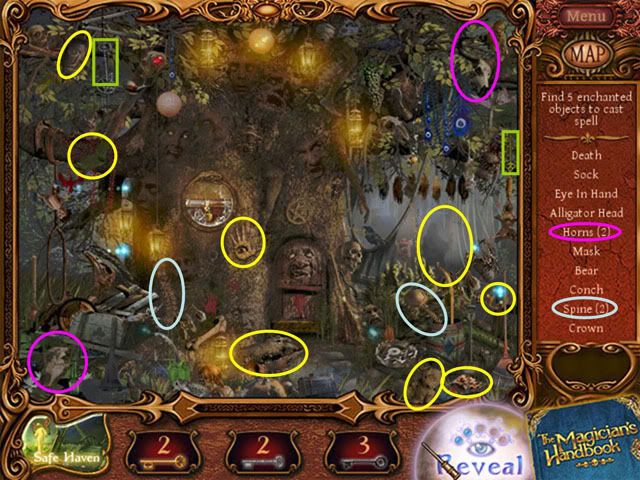
Tip: If an Object appears in the list with a number following it, such as "Birds (4)" that means you need to find four Birds, but it only counts as one "Object" toward your game goals. They will be outlined in a different color on the screen shot to help you find all the items in the group.
If you find two or more Objects in rapid succession, you receive a "QuickFind" bonus that increases your Grade for the Chapter. So identify several Objects visually, and then click on them quickly to get the QuickFind bonus.
Clicking on too many wrong Objects too fast ("Mis-Clicks") will reduce your available time (if playing in Apprentice Mode) AND reduce your Grade for the Chapter. You'll hear a faintly sad descending melody if you commit a Mis-Click.
There a RANDOM factor which gives the game much more replay value, but it also might mean that the screen shots contained in this Guide might not exactly your experience. However, most of the Locations must be re-visited several times, and the Objects don't seem to move around, so you might find that an Object that we found in Chapter 1 is required for you in Chapter 3 or 4 or 10. Again, you're mileage may vary.
Keys
Each Location may also contain hidden Gold, Silver, or Black "Keys" which are not listed on your required Objects list. The Keys allow you to unlock Chests in the Safe Haven.
If a Location has hidden Keys remaining, they will be listed on the Map when your mouse hovers over the button for the Location.
Note: You won't hear about Keys or be able to select the Keys until you enter one of the first Locations in Chapter 1, return to the Map and then back to any Location. The Fairy "Corrigan" is your tutor.
Tip: Find the Keys FIRST so you don't lose the chance to collect them if you later find all the other Objects in the Location. Keys are outlined in GREEN in the screen shots. They can be devilishly disguised and very hard to find.
If you miss a Key, don't worry too much about it, because it will still be in the Location for you to collect later. You revisit all of the Locations several times.
For the most part, this Guide will help you collect all the Keys, but using them is up to you.
At the beginning of Chapter 6, we'll visit the Safe Haven to use the Keys collected so far to buy a powerful Wand.
Hints
You start each Chapter with 5 Hints that are invoked by the Reveal button at the lower right side of the screen.
After you use up your 5 Hints, the Reveal button will slowly recharge in about 2 minutes.
You can also gain additional hints by invoking the "Reveal Spell" that you can unlock in the Safe Haven, which will restore your Hints to 5 (so use up all your hints before invoking the Reveal Spell).
Grades
You will be "Graded" on your performance in the game, no matter which Difficulty Level you choose.
Grades are dependent on the number of Hidden Objects you find, QuickFind bonuses, number of "Reveals" unused, and other factors. The highest Grade you can receive is A+.
Finding the minimum number of Objects in each Chapter will get you a Grade of C.
You can choose to continue to find ALL the Objects in a Chapter, which will increase your Grade to A or better.
You need an average grade of A or better in all Chapters in order to unlock the Wand of Keys, which is NOT available from the Safe Haven.
If you are not satisfied with your Grade, or do something that reduces your Grade (such as skipping a Puzzle or "Mis-Clicking" too much), you can Restart any Chapter from the page in the Magician's Handbook as long as you have not already completed the Chapter.
Annoying/Amusing Distractions
In many of the Locations you will be distracted by things like flying Magic Books, Carnivorous Flowers, Ghosts, Mist or Smoke, etc.
You can safely ignore these things; they are not harmful. But you can also click on them to get rid of them if they are annoying or distracting you.
The Repel Spell (unlocked in the Safe Haven) will also get rid of annoying distractions.
Mini-games and Puzzles
There are a variety of mini-games and Puzzles which are very much different from "jigsaw puzzles", "torn letters/pictures" and others you might be used to from other Hidden Object games:
Learning Spells
To learn a new Spell (such as "Fire", "Wind", "Petrify", "Heal", or "Detect"), you must return Spell Objects to their proper place in a split window, with a page from the Magic Handbook across the top of the screen (as a guide) and a colorful Scene at the bottom window.
Click on a Spell Object in the bottom list, and then click it the lower window to return the Spell Object to its proper place.
If you leave a Learning Spell Scene (return to the Map) before completing it, you will need to start over at the beginning when you return.
The Spells you learn in this mode are Permanent, and you may re-use them throughout the game during Puzzle Solving.
You MUST learn these Spells, because they are required for Puzzle Solving.
The Reveal button is available and will recharge during Spell Completing.
Puzzle Solving
To solve Puzzles, you need to use the Permanent Spells you have learned on Objects in a Location. To activate a Spell, click on it in the bottom list and then click on an Object in the Location to apply the Spell.
As you move your cursor around the Location, text will appear that might give you clues as to how to use the Spell. However, not all Objects will display helpful text.
To de-activate a Spell, or select a different Spell, click on it in the Spell Window at the bottom of the Scene.
If you leave a Puzzle Solving Location (return to the Map) before completing it, you will need to start the Puzzle over at the beginning when you return.
If you SKIP a Puzzle (only available after a few minutes of trying) you will receive a grade of C for the Chapter.
There is no penalty for Mis-Clicks while Solving Puzzles.
The Reveal button is available and will recharge during Puzzle Solving.
Fairy Finding
You are given directions to find the location of a Fairy in the Location and use a Permanent Spell to free it from Blacklore's enchantment.
The directions might say "Follow the line from [clue] past the [clue] to the [clue]" or "To the right of [clue] and above [clue] but below [clue]"
As you click on each Object in a clue a red "X" will appear on it to let you know that you have found the right Object.
When you click on the target Object using the proper Spell, you release a Fairy from Blacklore's evil enchantment and the Fairy returns to the Safe Haven.
Again, due to the Random Factor, your results might be different than what's contained here, but once you get the knack of it, these Fairy Finding puzzles are not too hard.
The Reveal button is available and will recharge during Fairy Finding.
Safe Haven
The Safe Haven is a special Location where time stands still (if you are in Apprentice mode).

You may return to the Safe Haven from any Location for a break and to visit all the Fairies you rescue.
You may use the Keys you have gathered to open Chests which contain Wand Upgrades, One-Time Magic Spells (Increase Reveals, Repel, etc.) and other surprises.
Each Chest requires a particular set of keys, such as 1 Black, 7 Silver, or 10 Gold.
The contents of the Chests are randomized, but you can assume that the more keys required, the more valuable the contents.
Tip: Don't use up your Keys early in the game. Wait until you have 10 Gold, 10 Silver, and 10 Black keys and then unlock those Chests to receive the "Wand of Enchanted Objects." We'll do that at the start of Chapter 6 in this Strategy Guide
There is one Wand that you can't unlock in the Safe Haven, the "Wand of Keys", which will help you track down the hidden Keys throughout the game. To unlock the Wand of Keys, you need to complete the game with an "A" grade average through all the Chapters.
Fairy Queen Statue Pieces
The goal of the final Chapter 11 of the game is to find all the pieces of the Fairy Queen Statue. There is one piece findable at each Location that you visit.
You will need to use your Detect Spell to find the pieces, which are all hidden by Dark Magic ("ooooh").
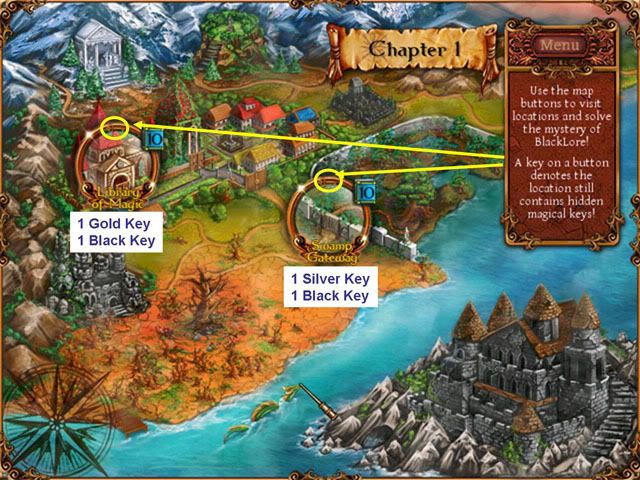
Chapter 1-A New Friend
Minimum/total Objects to find: 16/20
Permanent Spell to learn: Wind
Note: you won't hear about the Keys until you enter one of the first Locations, go to the Map and return to a Location again.
The Fairy "Corrigan" explains the basics of the game to you, and will re-appear at various points in the game to give you quick tutorials on new features.
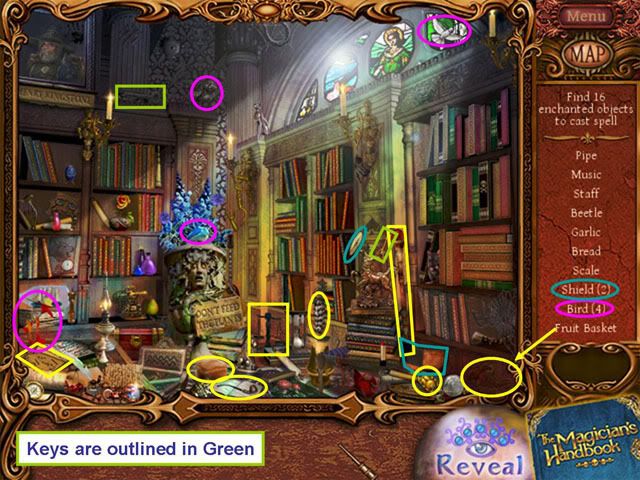
Library of Magic
Keys: 1 Gold, 1 Black
Swamp Gateway
Keys: 1 Silver, 1 Black
Magician's Handbook
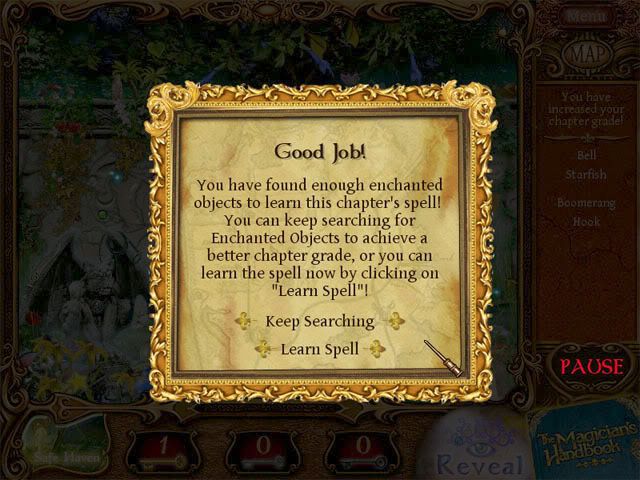
After you collect at least 16 Objects in these two Locations, you can proceed to learn your first Spell or you can continue to search until you find all the Objects in order to improve your Grade for the Chapter.
The Magician's Handbook lists your goals for each Chapter and also allows you to select new Wands as you unlock their parts in the Safe Haven.
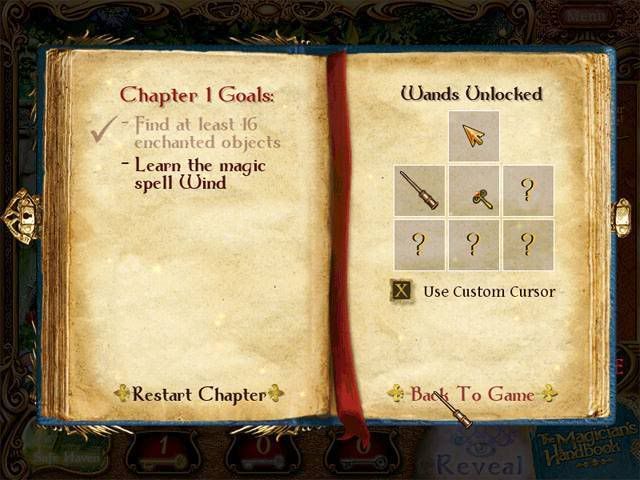
After you have found enough Enchanted Objects to complete the requirements for the Chapter, you will see this screen:
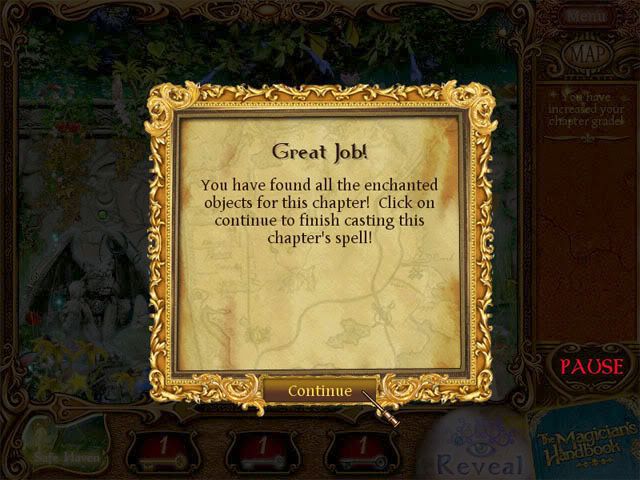
If you find ALL the Objects for the Chapter, you will see this screen:
Learn the Wind Spell
Now you get to learn your first Permanent Spell, "Wind".
You will need to place each Spell Object in the bottom window using the page from the Magician's Handbook displayed in the top window as a guide. The Fairy will help you place the Phoenix and then you need to place 7 more Spell Objects.
You may also use the Reveal button for help.
Remember, this is also randomized, so your list of Objects may be different from those shown here.
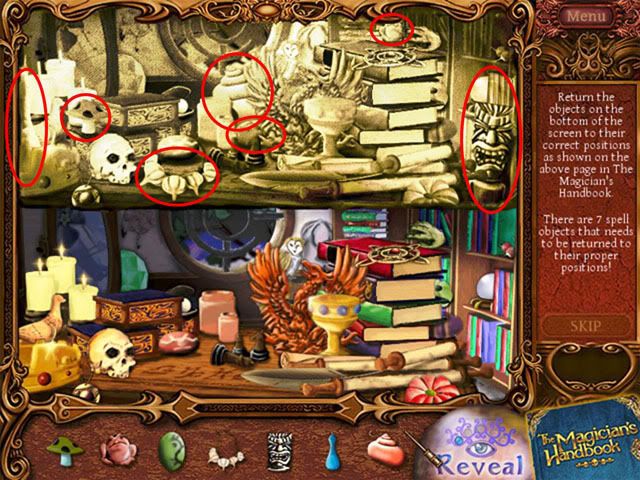
The Red circles indicate the spots for the remaining Objects.
Mis-Clicks are NOT penalized during Spell Learning.
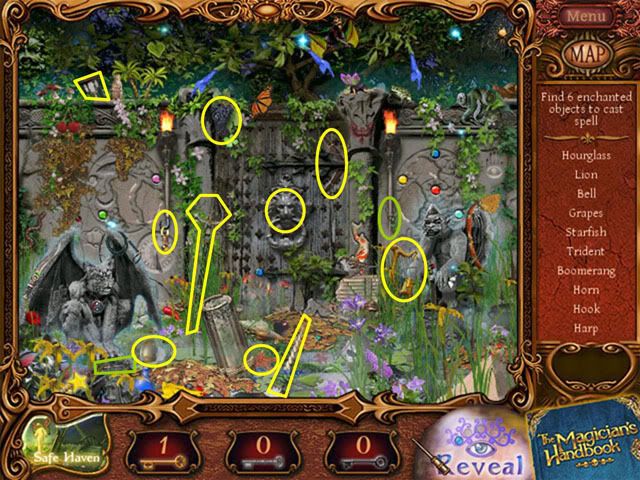
Puzzle: Swamp Gateway
This Chapter ends with a Puzzle, in this case at the Swamp Gateway. You'll need to use the Wind Spell to solve the puzzle.
The Fairy demonstrates how to use the Wind Spell to blow away leaves hiding the first piece of the wall. Find the rest of the wall pieces and return them to where they belong.
Your Reveal button will slowly recharge while you are solving a puzzle, giving you additional hints.
The Skip button will not be available until after some time while you are working on a Puzzle. If you skip the puzzle, you will receive a "C" Grade for the Chapter!
The Restart button lets you to start over at the beginning of the Puzzle.
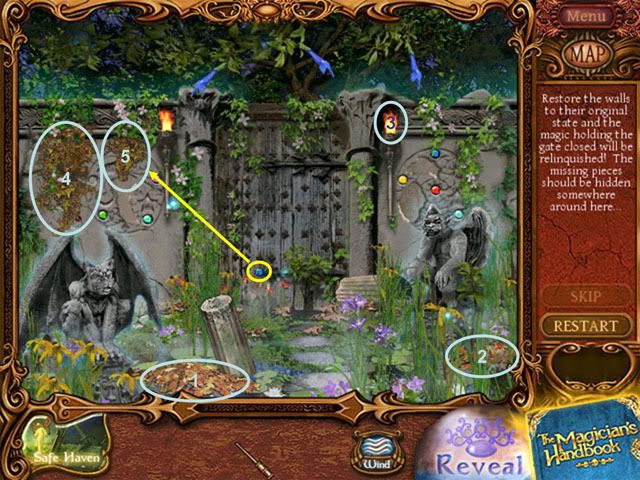
In the screen shot above, the light blue circles show where you should use the Wind Spell to reveal wall pieces. The screen shot below shows you where the pieces go.

Congratulations! You should have finished Chapter 1 with at least a Grade of "A", if not higher.
Chapter 2-The Watchers
Minimum/total Objects to find: 25/30
Permanent Spell to Learn: Fire
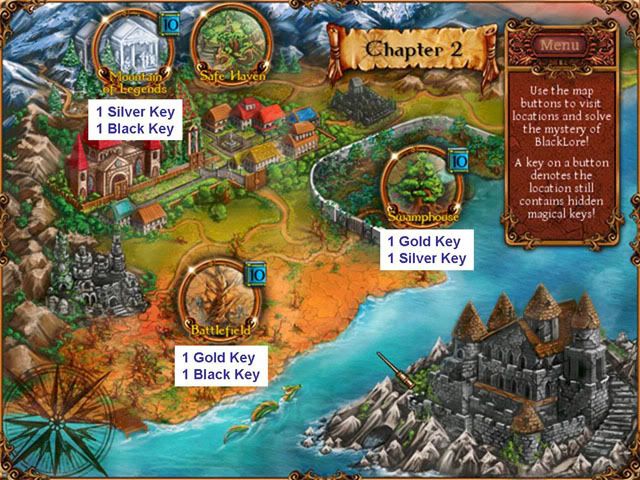
Mountain of Legends
Keys: 1 Silver, 1 Black

Battlefield
Keys: 1 Gold, 1 Black
Swamphouse
Keys: 1 Gold, 1 Silver
Learn the Fire Spell

There are eight (8) Spell Objects to place for this Spell. The Phoenix has already been placed and is circled in Yellow. The Red circles indicate the spots for the remaining Objects.
Puzzle: Mountain of Legends
Keys: (none)
You'll need to use the Fire Spell to solve this puzzle.
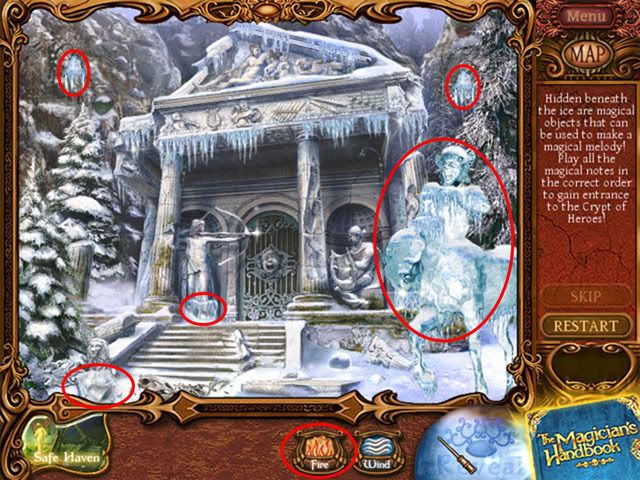
Use the Fire Spell on each of the areas outlined in Red above.
Gamezebo


Two bells are revealed. They need to be placed on the Hooks under the roof of the building.
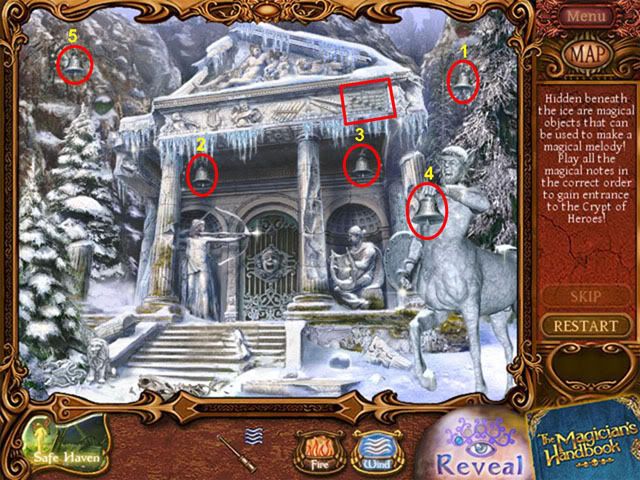
Notice the musical scale on the roof of the building. You need to play the 5 bells in order of descending pitch.
You'll need to listen to the pitch of each bell and sort them out, because the pitches can be randomized.
Use the Wind spell to ring the bells in descending order of pitch to complete the Puzzle.
